Showing posts with label christmas crafts. Show all posts

December 16, 2011

Scarfapalooza 2011

Sorry my posts have been infrequent as of late . . . remember the "Breaking Dawn" purse from the last post?  Well, it was a hit and I got orders to make two more!  Not to mention, I've had tons of regular orders as well.  This holiday season has been awesome for my shop!

I have a lot of people to "gift" for, as I'm sure all you guys do.  I always like to make presents for the 4 nieces on my side of the family . . . sorry, in-laws.  You have too many dadgum kids!  ; )  Seriously, I love all my nieces.  I always like to imagine I'm the cool aunt that watches "Adventure Time" and makes cool purses.  I'm afraid that I'm actually the creepy aunt that makes my nieces ugly crap and makes them put it on so I can take endless pictures.  Sigh.  Oh well.  You decide . . .

I've had fun playing with t-shirt scarves lately.  Here's my first one:


I made it to go with this dress--it has a crazy pattern in crazy colors so I never have any accessories to wear with it.  I cut up part of an old "Whoppers" t-shirt from high school to make it.  I get tons of compliments whenever I wear it.  Here's a great tutorial showing the basic method to making this kind of scarf.  All you need is a pair of scissors, a 100% cotton t-shirt and five minutes.  Literally.

I like my crafts like I like my women: cheap and easy.  (That's a joke.  I like difficult crafts, too.)  I decided to make scarves for my nieces.  I only had one day to do it since 3 of them were going to Utah for Christmas.  I did 5 scarves total in one afternoon.  Some of them are a little crazy but I was going on what they said their favorite colors were and also their personalities.


This was the first one I made for my friend Shelonna.  I really like the chunky braid . . . if you can braid hair, you can make this scarf.


A different version of the braid one for my oldest niece.


Neon green and purple, with a tiny peace sign charm for the next one . . .


I loved how the scarf matched the outfit she was already wearing!


Next up, for my 6 year old niece who said her favorite color was "ice blue."  Where do they come up with this stuff?  Anyway, I cut up an old shirt of mine that had a ruffled neckline.  I cut the neckline out and used it as one of the strands.  I thought it came out really pretty but . . . 


You can't please everyone.  LOL . . . 

Finally, for my 3 year old niece who is a total diva . . . 


A ruffled scarf.  This is perfect for the Diva since it resembles a feather boa.  These are so adorable and require NO sewing.  They're a little more complicated but it doesn't require any special skills (here's a great tutorial for this one).  The little candy cane rosette is glued to a hair clip that can be worn in her hair (doy) or as an accent on the scarf.

Since she's only 3, I didn't think she'd get what it was since it's basically a pile of fluffiness.  (Tip: When you layer all the different ruffles together, sew a tiny stitch in the middle to keep from losing layers and to keep them together.)


But I tell you, she opened it up and gasped, "I got a pink scarf!"  She wrapped it around her neck right away and didn't take it off the whole night!  She loved it.

So if you're still scratching your head (or digging through an empty wallet) on what to do for Christmas, these scarves are a great option, not to mention fun to make.

December 28, 2010

Candy Wrapper Headband Tutorial

I sort of cringe at calling this a "tutorial." It's more like a "Hey, look what I did, even though I'm not super happy with it, this is how I did it and do you have any ideas to make it better?" "Tutorial" is just slightly catchier . . . misleading, but catchier.

Anyway, I saw these candy wrapper headbands (much better-looking ones, mind you) on Etsy and I thought they were adorable. I have 4 little nieces on my side of the family so I knew I wanted to make them some for Christmas. I couldn't find a good tutorial online so I sort of guessed as to how it's done! If you like the headbands but don't want to go to all this trouble, check out this Etsy shop . . . the headbands look amazing and perfect.

So, let's get started! You'll need:

1 plastic headband, at least 1 inch wide
candy wrappers (enough to cover roughly 12 inches)*
scratch paper
pencil
iron-on vinyl
iron
Sharpie marker
sewing machine
thread
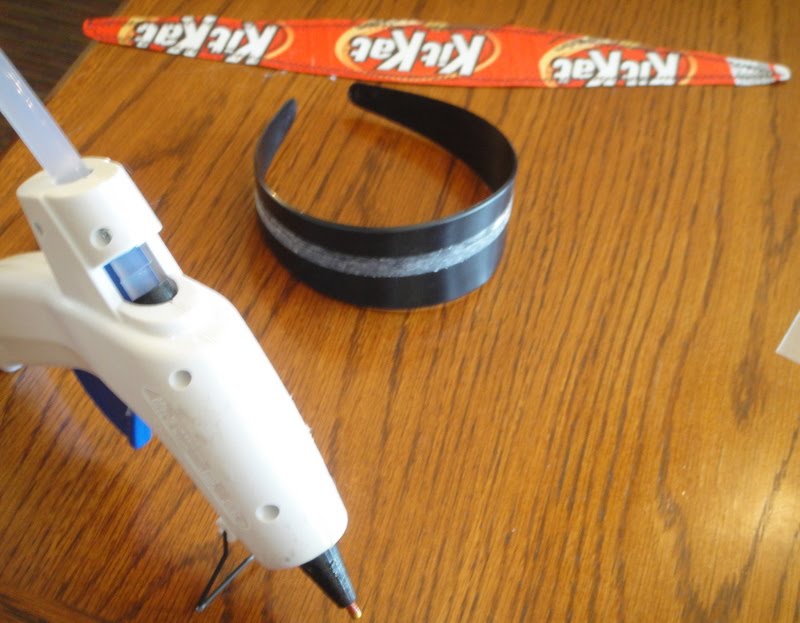
hot glue gun & hot glue sticks

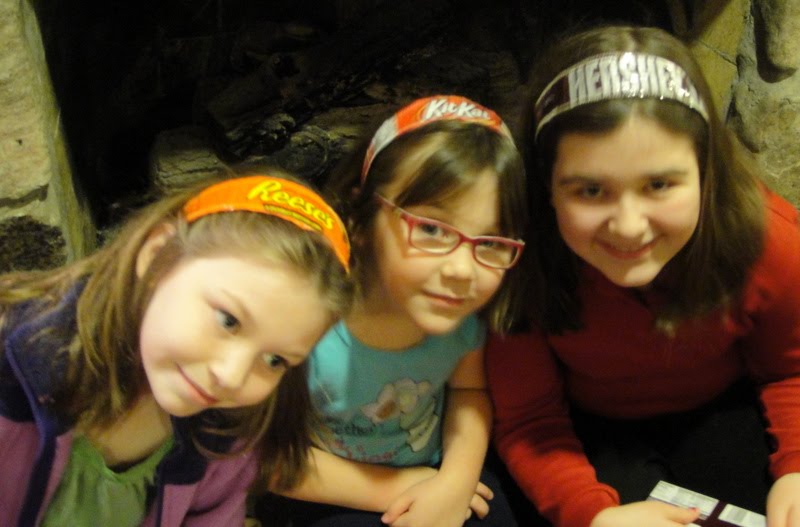
*I highly recommend choosing a paper-based wrapper (M&Ms, Skittles, etc.) as opposed to one that is more plastic and lined with foil (most chocolate bars are wrapped in this kind of wrapper). I used the foil-lined wrappers and as you can see (with the Hershey's and KitKat headbands) they wrinkled when I ironed them. When I looked at the Etsy shop that sells these, I noticed 99.9% of the headbands were NOT made from chocolate wrappers. My mistake! Reese's peanut butter cup wrappers are plastic but do not have foil on the inside so they held up much better under heat. I actually had to redo the KitKat one (you can see in the picture where my niece is wearing it that it's different) and used a King Size KitKat . . . those don't use foil either and worked better. To try to cut back on the wrinkling, I minimized the ironing time (I followed the vinyl instructions which was another mistake!) If anyone has any other suggestions, please comment and let me know!

1. Take your headband and starting with one end, stencil the outline of the headband with a pencil (this will be longer than a regular sheet of paper, so tape 2 sheets together). Leaving a 1/2 inch border around the stencil, cut it out.

2. Carefully open the candy bars. I snipped one end open with scissors and using the flap down the middle, peeled it open. Once the wrappers are completely open, clean (or lick--I don't judge) all the candy remnants out. Using the headband template you just cut out, line up your wrappers until you have enough to cover the entire headband. You may need to cut part of a wrapper off in order to fill the entire template. Make sure the logo is prominent when you make your design.

3. Pull out your iron-on vinyl. Using the paper template, cut out two separate templates (the grid-printed side is paper and you can trace around the template to make cutting it out easier). Peel the paper side off of the vinyl. Place the vinyl "sticky" (it's really not that sticky) side up. Now place your wrappers face down on the vinyl. If you have a brayer, roll it over the wrappers . . . this will help flatten the wrappers out. If not, press the wrappers down with your fingers. The vinyl is very forgiving, so if you need to move a wrapper, you can do so easily. When you're happy with the placement of the wrappers, peel the paper from the second sheet of vinyl and place it on the back of the wrappers. Smooth it out again with a brayer or your fingers.

When you're happy with how it looks, trim the excess wrapper around the edges.

4. Now it's time to iron. Set your iron to NO STEAM and on a medium (wool) setting. Using an old pillowcase or sheet to protect your ironing board, place the vinyl on the board. Cover the wrappers and vinyl with the paper from the two vinyl templates you cut out. Place heated iron on the vinyl for no more than 2 seconds (no, I'm not kidding). Do the same on the other end until the entire piece, wrappers and vinyl, are fused. If they are fused, do NOT iron the back. Only iron the back if you think it needs more heat . . . and only do iron for a second or two at a time or it will crinkle and be ruined.

5. When your vinyl is fused and cooled, line it up with your headband. Just like you did for the template in the beginning, trace the outline of your headband on the back of your vinyl using a Sharpie or permanent marker. Following that outline, carefully cut out your vinyl so it lines up with the headband.

6. This step is optional but adds a nice touch. If you're good with a sewing machine, add a small zigzag stitch to the outside of the vinyl making sure you don't go over the edge. (I would use the trimmings from the vinyl first to see what tension to set your machine.)

7. Final step! Set your glue gun to it's lowest setting. The heat from the glue gun can warp and wrinkle the vinyl, so apply glue to the edges of the headband only to avoid major wrinkles. Snip off any excess vinyl that may be hanging over the edge.

Poof! You're done. It's a pretty fast project once you get the hang of using the vinyl. Those of you who are more versed in headband and hairbow crafting, please give me any tips or pointers!

My nieces LOVED these headbands and went absolutely crazy over them. It also helped that I gave them the candy bar that inspired each of their looks. ; ) You'll see a little Skittles hairbow that I made for my little 2 year old niece . . . that's a whole different tutorial! If you guys are interested in that one, let me know and I'll write it up.


December 19, 2010

Ice Cream Cone Ornament Tutorial


When I was little, my mom taught my brother and I how to make these adorable ice cream cone ornaments. This project is super easy and cheap, so it's the perfect project to chase away Christmas break boredom. While the ornaments are kid-friendly, make sure to keep an eye on younger kids who will want to taste the "ice cream"!

Here's what you'll need:


Ivory Snow or Ivory Soap Bars (it takes approx. 1 soap bar per ornament)*
3 inch styrofoam balls
Colored ice cream cones
Cheese grater
Hot glue
Straight pins
Ribbon

*Ivory Snow laundry detergent is very difficult to find. If you can't find it, Ivory soap bars are fine--that's what I had to use.

If you're doing the project with kids, be sure to do these two steps first as they involve heat and sharp tools.

1. Spread hot glue (on a low temp) on the rim of the ice cream cone and set a Styrofoam ball on top. Repeat for all ornaments you'd like to make.


2. Grate the bars of soap until you have a pile of shavings that look like this.

Put the flakes in a bowl and add warm water a little warm water. Using your hands (the kids might like this part!), mix the water and soap flakes until you have a mixture of this consistency:

It looks a little like thick cottage cheese. It must be thick enough to not drip yet thin enough to spread. Using an offset spatula or butter knife, spread the soap mixture on the styrofoam ball. Make sure you coat the whole ball.

At this point, you can sprinkle glitter on top to give it an extra shine.

Let the ice cream cones dry overnight.

The next day, cut 8 inch lengths of ribbon for each ornament. Fold each strip of ribbon in half and tie a knot at the top. Poke a straight pin (the kind with a ball at the top) through the halfway point in the ribbon.

Using a pen or skewer, make a small hole on the top of the ice cream scoop. Dab a little hot glue inside the hole and push the straight pin into the hole.

Now your ornament is ready to hang on the tree!
This Ivory soap mixture is also useful for making fake snowballs. Just drop the ice cream cone and you can make your own snowballs. My mom said the cones will hold up for a couple of years if you pack them carefully. We've never tried to shellac them, but that might help with preserving the ornaments. If the cone breaks, you can always pull it off and glue a new one on.

Hope you enjoy this and have a great holiday!

December 10, 2010

Fabric Peppermint Drop Tutorial


Hey everyone!

I came up with this little project a week ago. I wanted some sort of Christmas-y accessory to wear but I didn't want to spend any money. I love candy stripes and colors at Christmas, so thus, the fabric peppermint drop was born! This little project requires no sewing. I literally made this out of "leftovers" from other projects. Here's what you need:


Scrap of white and red striped fabric (separate strips of white and red fabric would work as well) approx. 12 inches long and 3 inches wide

Large button (the one I used was about 1 1/2 inches in diameter)

Scrap of white tulle or netting approx. 5 inches by 7 inches

Hot glue gun


Take the striped fabric and twist it into a cord. Don't worry about raw edges . . . they'll only add to the cuteness of the finished drop.


Hot glue one end of the fabric cord onto the middle of your button. Wrap the cord in a spiral, gluing it down as you go. Don't forget to cover the sides of the button as well.


When you're done wrapping the button, it should look something like this:


Take out the tulle and lay the button facedown on it. Wrap the tulle around it, with the edges on the back.


Wrap one end of the tulle around your finger and tie it. Repeat on the other side. Trim the ends to your desired length and . . .


TADA! You're finished. I hot glued a pin to the back of mine to make it a brooch. You could also use this in place of a bow on a present. You could add it to a headband or bobby pin for a fun hair accessory. Glue an alligator clip to the back and make sweater or shoe clips. This little drop would also make an adorable statement necklace . . . think various sized and colored drops bunched together. The possibilities are endless! Enjoy!